Becoming a Validator
WARNING
This is still under development and will be available in a future release.
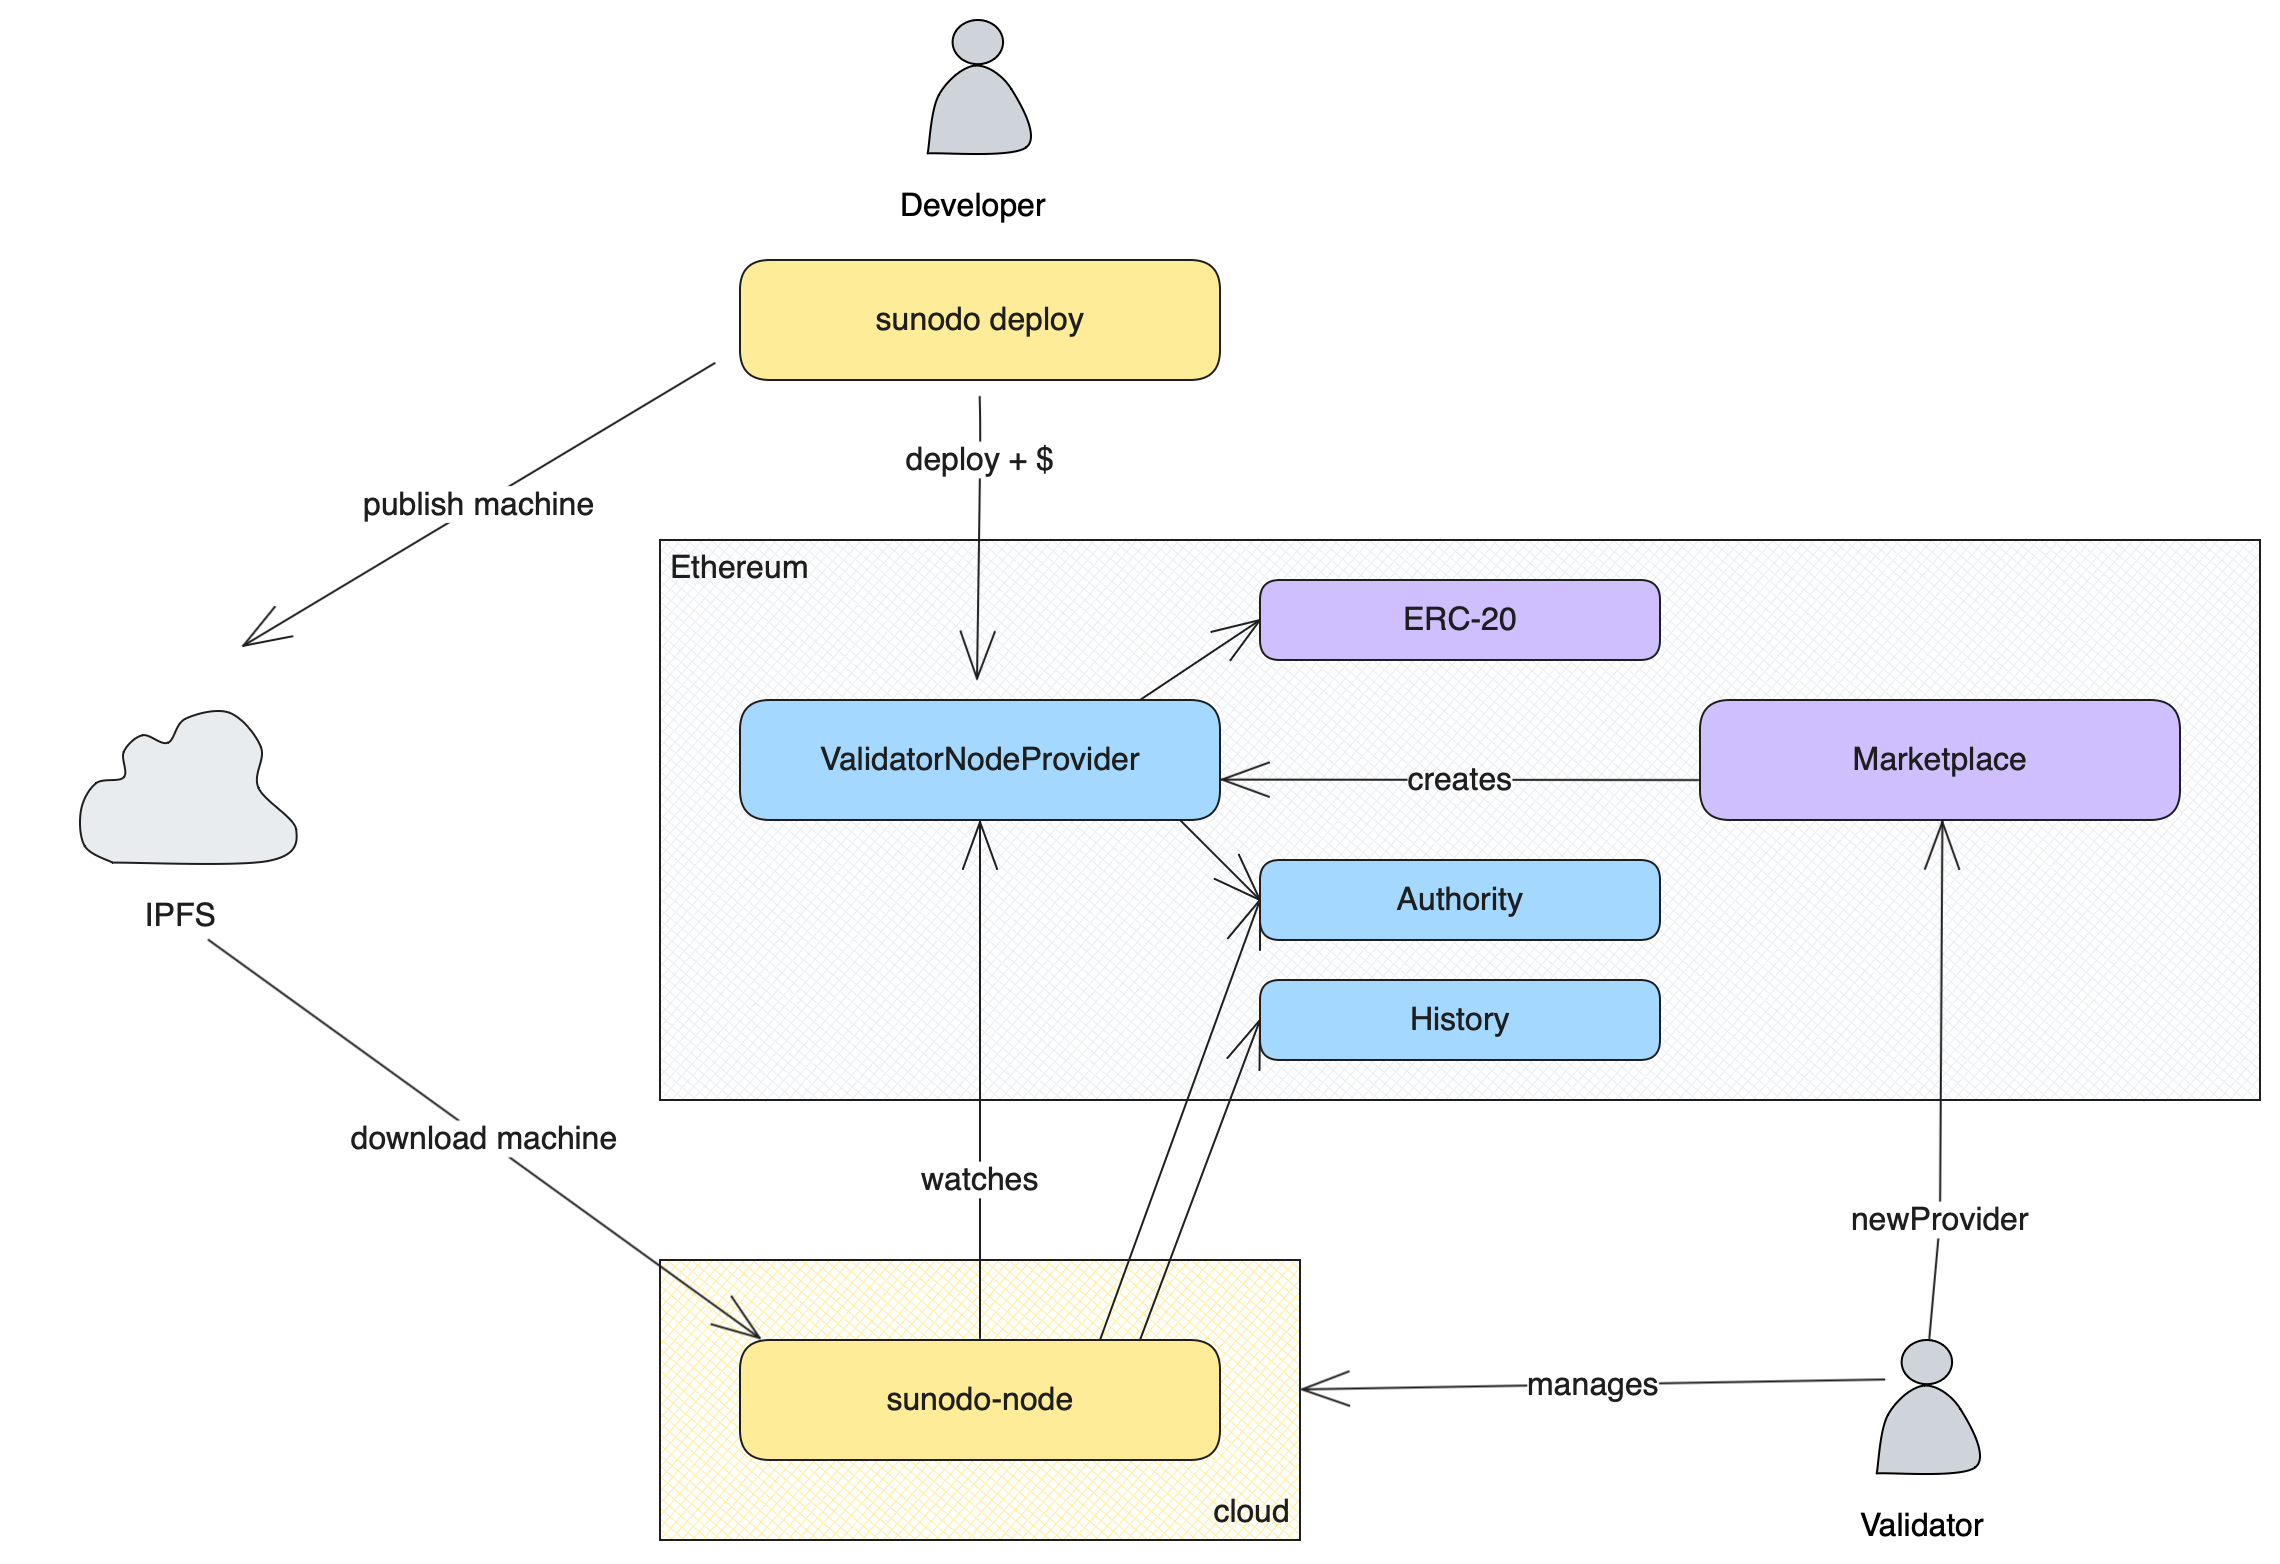
The following diagram illustrates the deployment system implemented by Sunodo.
Any person or institution who wants to become a validator must follow the steps below:
- Install the
sunodo-nodeCLI; - Create an Authority and History contract on the base layer using the AuthorityHistoryPairFactory;
- Create a ValidatorNodeProvider on the base layer using the Marketplace;
- Setup a Sunodo node.
Installing the sunodo-node CLI
Sunodo provides a separate CLI tool targeted to validators, which provides commands for the tasks described in this section. The tool can be install using homebrew or npm.
brew install sunodo/tap/sunodo-nodenpm install -g @sunodo/nodeCreating an Authority and History
The Authority is the Cartesi smart contract that implements the consensus model of the application validation. The Cartesi node sends the application's state to the Authority contract on every epoch (which is configurable).
The History contract is responsible for storing the claims of each application, is connected to the Authority contract.
The sunodo-node CLI provides a command to create a new Authority contract:
sunodo-node create authority
    --chain-id=<option>
    --rpc-url=<value>
    --private-key=<value>
    --mnemonic-passphrase=<value>
    --mnemonic-index=<value>
    --owner=<owner>
The owner option must specify the address of the account that will own the Authority and History contracts and must be the same account address that will be configured in the Sunodo node.
Creating a ValidatorNodeProvider
The deployment of an application is done through the deploy function of a ValidatorNodeProvider smart contract. Each validator must have its own instance of ValidatorNodeProvider.
A new instance can be create using the create provider command of the sunodo-node CLI:
sunodo-node create provider
    --chain-id=<option>
    --rpc-url=<value>
    --private-key=<value>
    --mnemonic-passphrase=<value>
    --mnemonic-index=<value>
    --validator=true|false
    --consensus=<value>
    --token=<value>
    --payee=<value>
    --price=<value>
The validator option flag indicates if the provider is a validator node provider or only a reader node provider. The default value is true, which means that a consensus value must also be provided. The value of the consensus option must be the address of the Authority contract created in the previous step.
The token, payee and price options are related to the billing of the provider. The token must be the address of the ERC-20 token to be used as payment for the application execution, the payee must be the address that will receive the payments and the price must be the amount of tokens charged per unit of time (second).
INFO
A token is required but if you don't want to charge anything for the service you can specify any token (i.e. USDC) and specify a zero price.
Setting up provider ENS
The ValidatorNodeProvider contract supports ENS integration, allowing the contract owner to set a name for the provider address by calling the setName function using the owner account.
ENS also supports text records, like email or url. These records can help the UI and interaction with the provider in a decentralized fashion. One text record of particular importance is the key io.sunodo.baseUrl, which is used to resolve the address of a node created for an application. The value of the io.sunodo.baseUrl text record key can use the following variables to resolve the node URL:
- {{application_address}}: the application contract address
- {{chain_id}}: the EIP-155 id of the selected chain
- {{chain_name}}: the name of the selected chain (mainnet, sepolia, arbitrum, arbitrum-sepolia, optimism, optimism-sepolia, base)
- {{provider_address}}: address of the provider
As an example a record value like https://{{chain_name}}.apps.sunodo.io/{{application_address}} would resolve the node URL to https://sepolia.apps.sunodo.io/0x0974CC873dF893B302f6be7ecf4F9D4b1A15C366 for an application deployed at 0x0974CC873dF893B302f6be7ecf4F9D4b1A15C366 in the sepolia chain.
Setting up the Sunodo validator node
The Sunodo validator node's job is to watch a specific ValidatorNodeProvider contract and execute application nodes based on the billing information.
The sunodo-node CLI provides to start command to execute a node:
sunodo-node start
    --chain-id=<option> (env: CARTESI_BLOCKCHAIN_ID)
    --rpc-url=<value> (env: CARTESI_BLOCKCHAIN_HTTP_ENDPOINT)
    --ws-url=<value> (env: CARTESI_BLOCKCHAIN_WS_ENDPOINT)
    --private-key=<value>
    --mnemonic-passphrase=<value> (env: CARTESI_AUTH_MNEMONIC)
    --mnemonic-index=<value>
    --kms-key-id=<value>
    --validator=true|false
    --verbose=true|false (env: CARTESI_LOG_LEVEL)
    --embedded-database=true|false
    --epoch-duration=<value> (env: CARTESI_EPOCH_DURATION)
    --postgres-url=<value> (env: CARTESI_POSTGRES_ENDPOINT)
    --snapshot-dir=<value> (env: CARTESI_SNAPSHOT_DIR)
    --consensus=<value> (env: CARTESI_CONTRACTS_AUTHORITY_ADDRESS)
    --history=<value> (env: CARTESI_CONTRACTS_HISTORY_ADDRESS)
    --provider=<value> (env: SUNODO_CONTRACTS_PROVIDER)
The node requires the following external components:
- an ethereum provider for the selected base layer;
- a postgres database;
- the wallet that owns the
Authoritycontract created in the previous section;
Ethereum provider
The node requires a connection to the selected base layer through a JSON-RPC provider. The provider must support both HTTP and WebSocket.
The user can run his base layer node, or choose a third-party provider from the non-exhaustive list below:
Database
The node uses a postgres database to store application state (inputs and outputs), and serves those over a GraphQL API. The user must setup a database server, or use a third-party managed database provider.
The database credentials provided to the Sunodo node must have permission to create new databases, because each application will have its own independent database. The schema of the application database does not need to be created beforehand because it's dynamically created by the Sunodo node.
The sunodo-node start command provides the option --embedded-database that will spin up a postgres instance. This option must only be used for test purposes, because persistence of data is turned off, there is no backup mechanism, and the security of the database access is not production-grade.
Wallet
Sunodo validator node interacts with the Authority smart contract created above to submit claims of the application state once every epoch. To do that it needs to be configured with the base layer wallet that is the owner of the Authority contract.
WARNING
A wallet must be used by a single Sunodo node. Do not share the wallet with other applications or other Sunodo nodes as the nonce management may cause issues.
The first and less safe way is to specify a mnemonic passphrase as the --mnemonic-passphrase command option and optionally the --mnemonic-index which defaults to zero. The environment variable CARTESI_AUTH_MNEMONIC can also be used instead.
A much safer way to specify the wallet is using AWS KMS as the private key manager. This is the recommended method for production applications, even if the node is not running inside AWS.
Refer to this blog post that explains in detail how to create an AWS KMS key for Ethereum accounts. Once you create a key you can specify the KMS key id using the --kms-key-id command line option and provide the appropriate AWS credentials that have access to use the key.
INFO
An AWS KMS key is much safer because the private key itself is not exposed to the Sunodo node application. What is exposed is the access to use the key, which can be revoked by a master AWS account. On the other hand, compromising the private key itself has no turning point.